But she's right: you can ring my bell. And I can ring yours. And hers. What the hell - let's just all ring each-other's bells shall we? And dim your lights. And open your garage door. And let's do it from the comfort and safety of my car, whilst driving around...
Speaking of hell, what the hell am I talking about???
A little while ago I got involved in a project that needed some hardware security testing. It was a complex system that used just about every protocol under the sun, including RF.
Now RF, like other 'invisible' transport mechanisms, always gets me interested because, in my experience, once data becomes invisible, something magical happens: they forget about security. Nobody can see what's going on, so we don't need to worry about it, right? Wrong. Time and time again I've seen this... MagStripes, InfraRed, RFID, Bluetooth, Magic Moon Beams. You name it, they'll send data over it insecurely.
In this case the RF was mostly standard stuff like WiFi and Zigbee, but there was also something going on in the 400MHz band, so how to take a look at what was there?
The obvious answer is to use an SDR (Software Defined Radio), and from previous projects I have a USRP which fits the bill. However, as I travel a lot, I prefer something a little more portable, so I'm always on the lookout for smaller alternatives. As it happens, a friend gave me a nice Christmas gift (thanks CJ!) of a FunCube dongle:

This very cool device can receive on any frequency from 64MHz to 1.7GHz and fits in my laptop bag so is absolutely ideal. It also presents itself to the PC as a pseudo sound card, so is very easy to interface to. This was a fantastic bonus for me as I'm already comfortable with the idea of converting audio into data and have used the soundcard in my laptop for that purpose on many previous projects (e.g. magstripes).
Radio is, almost by definition, very mysterious. You can't see it and you can't hear it, so using a soundcard is actually a very good shortcut to helping understand this completely unknown source of data. It's not intuitively obvious that it should be that way, but the human brain is very good at recognising patterns, and the soundcard not only provides us with auditory data that our ears will immediately be able to latch onto, but also visual data in the form of an editable wave file. The bottom line is that I don't understand how radio works, and I don't particularly want to - all I want is to be able to capture whatever's being sent over it and convert into something I can deal with - i.e. bits and bytes. So how to do that?
The first task is to determine exactly what frequency our signal is on. There are several ways of doing this, and the simplest is to make a rough guess and just take a listen. If you're anywhere close you'll hear something when you activate the device, and you can then tune up or down until you've found the centre frequency and you're getting nice crisp clean signals. This is particularly important when trying to convert mysterious airy-fairy analogue signals back into nice reliable 0s and 1s, as any deviation can end up corrupting your data beyond all recognition.
Another way is to use a spectrum analyser. This is essentially another type of RF receiver, that listens on a very wide band and shows you any spikes or other discrepancies, one of which will be the signal you're looking for. This can be in the form of software using the FunCube itself, such as HDSDR (Windows) or QUISK (Linux), or a standalone hardware device like the RF Explorer. I actually use both. The RF Explorer to quickly find the signal, and then QUISK or HDSDR to fine tune.

So getting back to our examination, I can't talk about the actual device in question, but since I have a wireless doorbell, let's take a look at that instead...

Like most such devices, it helpfully tells you what frequency it's using on its R&TTE approval label. In this case, 433.92 MHz.
Putting that into HDSDR and hitting the button produces a nice 'hot' line right on the centre (the white and orange blob in the top window), so it looks like we're in the money... We can also hear what is obviously data.

OK, so now what? How do we get it from the sound card into nice friendly binary data?
Although we've decided against using the USRP, it's companion software, GNU Radio, is the obvious choice. It has a great helper tool called GNU Radio Companion which makes this kind of task an absolute doddle. There is a plugin for the FunCube which is now bundled with the main GNU Radio distribution, so no extra work is required to get it up and running.
Firing it up, we can build a simple setup that connects our funcube to our speakers:

and again, if we run it, we get some nice 'data' sounding output... So we can hear it, and it sounds like data, but we still can't do anything useful with it. Saving it to a wavefile is just as easy:

and now this is where the fun begins. We can edit that file with any audio editor. I used Audacity but pretty much anything will do.

We can clearly see our data bursts, and if we zoom in:

Now I know I said I wasn't interested in understanding radio, but there is one little thing that will help to convert our data from it's current analogue form into proper digital, and that's modulation. There are many modulation schemes out there, but the two you're most likely to encounter at this level are FM (Frequency Modulation) and AM (Amplitude Modulation). FM is normally used for things that need reasonably high fidelity, like speech or music, but AM, although it can also be used for speech and music, is perfectly suited to binary data as all it needs to be is either 'ON' or 'OFF'. This is also known as OOK, or On-Off Keying, and as we can see from our sample, this is clearly what we are dealing with here. We have a flat line when we're 'OFF', which then becomes wavy when we're 'ON'.

Now we know we're dealing with AM, we can get GNU Radio to do one more job for us: demodulate the AM signal.

And our signal now looks like this:

Now, instead of bursts of wavy stuff, it's pretty much a straight line that goes high or low which is very clearly binary data. We have long pulses and short pulses, and the whole sample is simply this short pattern repeating. If we assume the short pulse represents a 0 and the long a 1, this decodes as:
0100000011110
Add some leading zeros to bring it up to a multiple of eight bits and we get 00001000 00011110, which is 08 1E in hex. Of course it may actually be interpreted differently - the 0 and 1 may be the other way around, and the bit order may be reversed, but for our purposes, at this stage, it really doesn't matter as long as it makes some kind of sense.
Great, so now what? I know my doorbell push-button is spitting out '081E', so therefore the bell itself must be listening for '081E' and ringing when it hears it. My neighbour's bell-push won't set it off as it's presumably sending out a different number. But how to test this?
Ideally, I'd like to transmit my own signal, from something other than the bell-push, and if the bell rings I know I've got it right. Unfortunately, as cool as it is, the Fun Cube is just a receiver, so we need something that can transmit as well... The easy option would be to go back to the USRP, but I've already discounted that as it won't fit in my laptop bag and I'd like to be able to do this on the move...
As I mentioned, the original device we were looking at was also using WiFi and Zigbee, so we were using an Ubertooth 2.4GHz dongle to poke around with that. I knew there were chips in the same device range that did sub-GHz frequencies, so I asked Mike Ossman, the Ubertooth's designer, if he knew of any projects utilising these. I was in luck: he did. Not only had he got some fun and interesting research of his own, but he pointed me at RFCat, a new project (at the time) designed to do exactly this kind of thing. Perfect! Not only would I be able to receive the signals from the bell-push, but I should be able to emulate them as well.
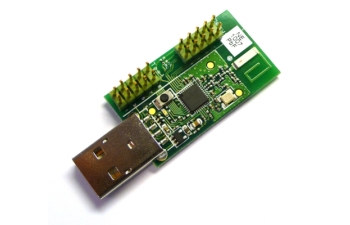
RFCat is based around a Texas Instruments SoC (System on Chip) called the CC1111. These are really very cool devices, which provide microprocessor and built-in RF transceiver all in one package. This one even has an AES capable crypto co-processor and built-in USB, so it is the ideal platform for this kind of tomfoolery...
Development kits in 433, 868 and 915 MHz bands are available off the shelf, and come in two forms: either as a standalone USB dongle (868/915 only):
or these nifty wristwatches:

RFCat is a replacement firmware package for the USB dongle part of the kit, and allows low level access to the radio functions via a simple USB command interface. Oh, and it's in python. Joy! :)
So one impatient wait for an overnight delivery later I'm in business and I've got my RFCat dongle up and running. It has a nice object oriented interface, so all you need to do is create an instance and start doing stuff with it (my commands are in bold)...
$ rfcat -r
'RfCat, the greatest thing since Frequency Hopping!'
Research Mode: enjoy the raw power of rflib
currently your environment has an object called "d" for dongle. this is how you interact with the rfcat dongle:
>>> d.ping()
>>> d.setFreq(433000000)
>>> d.setMdmModulation(MOD_ASK_OOK)
>>> d.makePktFLEN(250)
>>> d.RFxmit("HALLO")
>>> d.RFrecv()
>>> print d.reprRadioConfig()
Python 2.7.2+ (default, Jul 20 2012, 22:15:08)
Type "copyright", "credits" or "license" for more information.
IPython 0.10.2 -- An enhanced Interactive Python.
? -> Introduction and overview of IPython's features.
%quickref -> Quick reference.
help -> Python's own help system.
object? -> Details about 'object'. ?object also works, ?? prints more.
In [1]: d.ping()
PING: 26 bytes transmitted, received: 'ABCDEFGHIJKLMNOPQRSTUVWXYZ' (0.002653 seconds)
PING: 26 bytes transmitted, received: 'ABCDEFGHIJKLMNOPQRSTUVWXYZ' (0.002528 seconds)
PING: 26 bytes transmitted, received: 'ABCDEFGHIJKLMNOPQRSTUVWXYZ' (0.004721 seconds)
PING: 26 bytes transmitted, received: 'ABCDEFGHIJKLMNOPQRSTUVWXYZ' (0.004821 seconds)
PING: 26 bytes transmitted, received: 'ABCDEFGHIJKLMNOPQRSTUVWXYZ' (0.004573 seconds)
PING: 26 bytes transmitted, received: 'ABCDEFGHIJKLMNOPQRSTUVWXYZ' (0.002605 seconds)
PING: 26 bytes transmitted, received: 'ABCDEFGHIJKLMNOPQRSTUVWXYZ' (0.002430 seconds)
PING: 26 bytes transmitted, received: 'ABCDEFGHIJKLMNOPQRSTUVWXYZ' (0.002678 seconds)
PING: 26 bytes transmitted, received: 'ABCDEFGHIJKLMNOPQRSTUVWXYZ' (0.002519 seconds)
PING: 26 bytes transmitted, received: 'ABCDEFGHIJKLMNOPQRSTUVWXYZ' (0.002820 seconds)
Out[1]: (10, 0, 0.0331571102142334)
In [2]: d.setFreq(433920000)
In [3]: d.RFxmit('\x08\x1E')
In [4]:
At this point, not surprisingly, my doorbell didn't ring. This is because our interpretation of the data, giving us HEX 081E, is a little bit simplistic. The RFCat dongle doesn't understand that we want to represent a 0 as a short pulse and a 1 as a long, so we have to do a bit more work to get it into a format that RFCat can deal with...
A traditional microprocessor controlled radio circuit would typically have a separate circuit or daughterboard for the radio portion, and the microprocessor would signal the data it wanted to send by toggling a pin HIGH/LOW. The microprocessor would be entirely responsible for making sure that the timing was correct - i.e. that it held the pin HIGH for as long as it wanted the RF to be 'ON', and LOW for the duration of the 'OFF' period. However, in these SoC devices, the radio part is all done for you and you simply need to tell it what modulation scheme you want, speed of transmission etc., feed it some data and it will do the rest.
As we already know the modulation scheme (AM/OOK), that bit's easy, so now we just have to think of our original signal in terms of OOK, and what our data would need to look like to produce the same signal.
Looking at the original trace, it's pretty 'readable', but If we want to really tidy it up we can turn it into a square wave and this will make visual checking of bit lengths much easier and more accurate. Since a .wav file is just a header with a bunch of values for each sample, it's really easy to manipulate. In this case we want to take any value that is below 0 and set it to absolute minimum, and anything above 0 we set to maximum, which is effectively what the original source was doing before the signal got converted and sent over RF - a 0 was a pin going LOW and a 1 was a pin going HIGH...
Accordingly, I wrote a little command line tool for tweaking wav files:
$ wav-cli.py /tmp/test1.wav square 0 out /tmp/ts.wav
Converting to square wave
Writing /tmp/ts.wav
and this is the result:

Now we can accurately convert the signal into true OOK binary. We take the smallest element as our single binary digit, and then represent the data with a 1 when we want the line to go high, and 0 when we want it to go low, taking into account the size of our pulse compared to the single binary digit. In this case we only have two different size pulses - short and long, so we can represent them with a single or double digit:

Again, we need to add some leading or trailing 0s to give ourselves an 8-bit multiple, so the final number we end up with is 00101100 10010010 01001001 01101101 10110010, or 2C 92 49 6D B2 in HEX. Since it's always the same, we don't really need to understand what this message 'means', only to be able to reproduce it.
So in theory, if I set up RFCat to work in OOK mode with the correct speed and modulation, I should be able to transmit 2C92496DB2 and my doorbell should ring (the speed I get by measuring a short pulse width in seconds) ...
In [1]: d.setFreq(433920000)
In [2]: d.setMdmDRate(int(1.0/0.000302))
In [3]: d.setMdmModulation(MOD_ASK_OOK)
In [4]: d.RFxmit('\x2C\x92\x49\x6D\xB2')
Hmm.... Nothing. However, my bell-push didn't just transmit the message once, it sent it dozens of times, so maybe I need to do the same:
In [5]: d.RFxmit('\x2C\x92\x49\x6D\xB2' * 60)
Nope, still nothing. Going back to my original trace I could see there was a gap between each data pulse, which we can easily simulate by adding some extra '0' bits, so:
In [6]: d.RFxmit('\x2C\x92\x49\x6D\xB2\x00\x00\x00' * 60)
Bingo! The doorbell rings and my dogs go crazy telling me there's someone at the door! Nice!!!
Well, this is very cool and all, but it's not very, erm... Bond, is it? I mean, Daniel Craig isn't going to get the girl, save the world and keep Dame Judi happy by saying... "Hang on Bad Guys, I've just got to get my laptop out... plug in this USB dongle... nearly got it... just a tick... Ouch, that hurt!"
No. Not really.
What we need is something much cooler, sexier, and, well.... shiny! Something Gucci that's always right there, ready to go at a moment's notice... .
But wait! What's that in the box of bits that came with my dev kit? A wristwatch? With a frikkin' transmitter built into it???? OK.... now that's what I'm talkin' 'bout!
Come to Papa...

And so, I give you the latest thing from my local toy store... It's called "radio":
Chronos Integrated Commander
Or ChronIC for short...It's basically a cut-down RFCat-like firmware package that allows you to use the watch to transmit arbitrary signals. You can set it up either from the watch itself, or via the original Chronos dongle with a python helper, and then the up/down buttons on the right of the watch do the transmitting.
The python helper looks like this:
$ chronic-cli.py
Usage: /usr/local/bin/chronic-cli.py <COMMAND> [ARG(s)] ... [<COMMAND> [ARG(s)] ... ]
Commands:
BAUD <RATE> Set RF modem baudrate
BYRON Configure for Byron doorbell emulation
DELAY <0-255> Delay in MS between each DATA transmission
DOWN <HEX> <HEX> <HEX> Set DATA for DOWN button - 3 * 63 bytes
EXIT Force sync mode EXIT on Chronos
FREQ <FREQUENCY> Set Frequency (e.g. 433920000)
FRIEDLAND Configure for Friedland doorbell emulation
MAN <'ON'|'OFF'> Set Manchester Encoding
MOD <FSK|GFSK|OOK|MSK> Modulation:
FSK - Frequency Shift Keying
GFSK - Gaussian Frequency Shift Keying
OOK - On-Off Keying (in ASK mode)
MSK - Multiple Frequency Shift Keying
REPEAT <0-255> Number of times to repeat DATA when button pressed
RUKU Configure for Ruku garage door emulation
SERIAL <BAUD> Set access point comms baudrate (default 115200)
PULSE <WIDTH> Set pulsewidth (baud rate = 1.0/pulsewidth)
TIME Synchronise time/date
UP <HEX> <HEX> <HEX> Set DATA for UP button - 3 * 63 bytes
Commands will be executed sequentially and must be combined as appropriate.
It is recommended to finish with an EXIT to help conserve battery.
Full instructions are in the README in the github repo, but here is an example of setting it up to ring my doorbell. Put the watch in 'SYNC' mode, and then:
$ chronic-cli.py freq 433920000 man off delay 0 repeat 60 pulse 0.000320 up 2C92496DB2000000 '' '' down 2C92496DB2000000 '' '' exit
Setting Frequency: 433920000 (OK)
Setting Manchester Encoding: OFF (OK)
Setting delay: 0 (OK)
Setting repeat: 60 (OK)
Setting pulsewidth: 0.00032 (3124.237061 Hz) (OK)
Setting UP Button: (OK)
Setting DOWN Button: (OK)
Sending EXIT command
Or you can take the shortcut:
$ chronic-cli.py byron
Setting up for Byron Doorbell
Setting Frequency: 433920000
Setting Manchester Encoding: OFF
Setting Delay: 0
Setting Repeat: 60
Setting PulseWidth: 0.000320 (3124.237061 Hz)
Setting UP button: 2C92496DB2000000
Setting DOWN button: 2C92496DB2000000
Or use the built-in menu option:
And there are plenty of other targets...
Discussions on the gnuradio mailing list back in 2006 show that the obvious one of a car key was being looked at. Matt Ettus says:
"After the Wired article today, I've received a couple of email from people who are concerned that the USRP could be used to clone their keyfob transmitters for car alarms and garage doors. I'm not concerned, since there are already many ways to do this (just check the back of pupular science magazine). However, I am curious about it. I know that we can capture and play back any rf signal. The question is whether that replayed signal would result in the door being unlocked. I was under the impression that most of those systems allow an unlock code to only be used once, but does anyone out there know for sure?"
Well, here's your answer:
Unlocking and re-locking my son's Beemer:
And the wife's Disco (note the pause and the second set of 'clunks' - this is because the first command only opens the driver's door, but because we have the option to send multiple sequences we can send another open command which then opens the rest of the doors):
Of course, opening car doors is a nice party trick, but because modern vehicles are secured by rolling codes, that's all it is - a party trick. You'll be able to do this once and once only with each 'hacked' sequence...
What's of more concern to me are devices like the 'Owl Plug':

These handy little devices allow you to control mains voltage appliances via RF. Clearly, this could have serious consequences if care is not taken when switching things on and off. What if it's an electric heater and it got shoved into a corner to vacuum the room? It gets switched back on and bingo, the curtains are on fire! Let's hope they've made the protocol nice and secure then!
Oh, dear. No rolling code. Same bit sequence every time:

And the only difference between the five buttons on the remote is a few bits. I suspect, therefore, that the only difference between my remote and my neighbour’s will also only be a few bits, so it's probably not much of an exercise to figure out which ones I need to brute force to be able to go around switching things on and off at random (I've ordered another one and will check, so watch this space...).
As usual, the code is available on the Aperture Labs tools page, but please bear in mind that while playing with your own RF devices is perfectly OK in any reasonable society, playing with other people's (without their permission) is most definitely not (and probably illegal)! Behave! :)
I attended a talk last week by Utz Roedig of Leicester University about a plethora of current research interests in the Internet of Things/miscellaneous undocumented radio protocols.
ReplyDeleteOne interesting paper he's soon to publish is on localised firewalls for insecure home automation networks - essentially detecting radio signals from outside your environment and jamming them, whilst still allowing your own through.
A pretty interesting project (obviously it cannot be a perfect system, but particular setups he was able to catch all external signals).
http://www.research.lancs.ac.uk/portal/en/publications/defend-your-home-jamming-unsolicited-messages-in-the-smart-home%28fbaea7db-46cb-4521-8962-05d8b4753f73%29.html
Oops, s/Leicester/Lancaster/.
DeleteAnd you haven't even started with the burglar alarms and remote keyless entry systems... it doesn't really get any better.
ReplyDeleteYes I have! (and you're right!) :P
DeleteInteresting! Have you approached any of the manufacturers with your findings? I've been stonewalled by most, and the response from the others has been lacklustre.
DeleteThis is also very useful for receiving/transmitting/debugging over 433mhz :-)
ReplyDeletehttp://www.xplmonkey.com/rf.html
Very interesting indeed, thanks for the read.
ReplyDeleteCould you have bypassed the Funcube entirely and done the early sniffing with the RFCat device?
You could, but it would be much harder as you have no handle on what you're looking for. The Funcube allows you to determine baudrate, modulation scheme, manchester encoding, etc. Having said that, I know atlas has some techniques for doing this purely with RFCat, but since I had the Funcube before I had RFCat, I've got used to doing it this way so I haven't really looked into it any further.
DeleteThe RFCat is versatile, but it's designed to receive given modulation schemes at given baud rates. You can bypass a lot of this to give raw data in as raw a format as possible, but you still need something to go on.
DeleteMuch cheaper than the FunCube is any of the RTLSDR TV dongles. You can get exactly the same output and use GRC to build demodulators as well. You still only have limited bandwidth (2.4MHz or so), but this is more than enough to work with most embedded RF systems.
In all honesty though, trying to receive the data is still just trying to infer what is going on. If you have the transmitter in hand, pull it apart and work out what it is doing. If it is simple AM OOK/ASK, whack a logic analyser on the output from the micro and read it there. If it uses one of the integrated transceiver chips like CC111x or one of the Nordic Semi ones, sniff the SPI bus between it and the micro.
This doesn't work with one of the SoCs unless they leave the code unlocked. Which they do now and then.
Great Stuff, Major! You certainly are a force to be reckoned-with...
DeleteUncle_Ira
Hey Adam,
ReplyDeleteGreat writeup, I was just wondering about the car unlocking/locking -- surely with the rolling code you need to first block the original keypress (or capture it away from the car) and then you can replay it to the vehicle?
Also you can go straight to the AM/OOK signal in HDSDR by just recording the demodulated signal, I did something similar with fixed key remotes: https://andrewmohawk.com/2012/09/06/hacking-fixed-key-remotes/
-AM
Hi Andrew,
DeleteThanks, and yes, you need to capture the rolling code out of 'earshot' of the vehicle. As far as demodulating in HDSDR, I've done it that way but I tend to use Linux rather than Windows for this stuff, but for windows bods that's a good tip.
I came across your blog entry just before I hit the publish button - good stuff! Great minds think alike! ;>
Something about fools here :P
DeleteYeah i've recently been enjoying rtl_tcp to stream the data and control the devices.
Can you give any clues as to what you found with the wireless alarms? (I don't have one to test)
how is this watch working with that renmote keyfob? aren't automobile remote keyfob setups in the 315MHz range?
ReplyDeleteCan this watch go beneath the stated 433MHz range somehow?
The watch uses a CC430F6137 SoC with a sub-1GHz transceiver. It can deal with all four common bands - 315, 433, 868 and 915MHz. There are three models of watch for three of those bands, but the difference is in the antenna. It will work on all of the frequencies, albeit with heavy loses.
ReplyDeleteNot too far from my experiments :)
ReplyDeletehttp://geekdistillery.blogspot.it/2012/12/a-cheap-ti-ez430-chronos-watch-to.html
The unsecured radio of switchable power sockets (most of them not nearly as clunky as the model you've pictured ;) has actually been happily used for quite some time now, with most of the different vendors' formats reverse engineered and integrated into universal transceivers. For example http://www.telldus.se/products/tellstick_duo has a convenient user interface where you just press a button on your remote and it will detect type (brand, model) and coding (house, unit code) automatically.
ReplyDeleteAn even larger and more prolific community can be found with the home automation crowd: http://busware.de/tiki-index.php?page=CUL (available in different versions and for both 433 and 868 MHz, used with http://culfw.de/culfw.html) can handle not only doorbells and power sockets but also most things from smoke detectors through temperature/humidity/etc. sensors to heating actuators. Unfortunately, even though it's open source, they tend to not explicitly document the formats and encodings.
You describe this topic very well.I really enjoy reading your blog.
ReplyDeletegarage door mississauga
Great post! But for those of us with SDRs, how do we get the sound card-like audio for demodulation, or is there a way around that issue?
ReplyDeleteGNU Radio Companion is still your friend... you may need to build some other SDR blocks using osmocom:
Deletehttp://sdr.osmocom.org/trac/wiki/GrOsmoSDR
I'm beginer with the EZ-Chronos. I like your blog and your humor sense, the " Come to Papa" in this post make me laugh :D I try use Chronic with my EZ-Chronos 915MHz, wish me luck, I work hard to learn. Regards!
ReplyDeleteIs there any device like CC1111EMK module but that can work with all common frequencies 300 – 348 MHz, 391 – 464 MHz and 782 – 928 MHz all in one device ?
ReplyDeleteKind Regards
There is now!
Deletehttps://greatscottgadgets.com/2015/09-30-introducing-yard-stick-one/
hi, I have a problem to open the file. gnuradio wav with audacity even it it is 3MB. An idea about this problem?
ReplyDeleteThanks for this good tutorial ! it very great !
Jasko
Hi Adam,
ReplyDeleteGreat post and work. After reading your this i decided to try and replay signal in same way using ChronIC.
Recorded the signal using cheap rtlsdr r820t and HDSDR, analysed/decoded it and feed the watch with right parameters using your tools and next thing door openes :)
It was one of BENINCA remote (LOT2WMS) which is very popular here...
I was wondering if you knew of a cheaper alternative to the FunDongle that also was supported by a plugin in GNU radio. For instance, do you know if the RTL2832U is?
ReplyDelete"$ wav-cli.py /tmp/test1.wav square 0 out /tmp/ts.wav
ReplyDeleteConverting to square wave
Writing /tmp/ts.wav"
I want to do that but I don.t know how!
Can you tell me all the step please?
If I open the termin and I write that it says: comand doesn't found
These handy little devices allow you to control mains voltage appliances via RF. Clearly, this could have serious consequences if care is not taken when switching things on and off. What if it's an electric heater and it got shoved into a corner to vacuum the room? It gets switched back on and bingo, the curtains are on fire! Let's hope they've made the protocol nice and secure then! salwar kameez lawn suit , pakistani lawn salwar kameez 2016
ReplyDeletehusqvarna 359
ReplyDeletebest waterproof work boots
stihl 021 specs
who makes hyper tough tools
I was captured with the piece of resources have got here. Big thumbs up 바카라사이트
ReplyDeleteKeep checking for new information on this. Good job 카지노사이트
ReplyDeleteLooking forward to reading more. Great article post. 온라인카지노
ReplyDeletewww.flangesdimensions.com
ReplyDelete, you can rest assured you're in capable hands. Their team of experts possesses extensive knowledge in flanges dimensions, guiding you towards the ideal flanges for your specific requirements.
temporary home internet options are crucial during moves, and Moving Internet stands out for its reliability. I recently utilized their services, and the speed and ease of setup exceeded my expectations. Highly recommended!
ReplyDeleteIf you're in need of event wifi rental, Wifi Hire is the go-to choice. Their fast and secure connections made my recent conference a breeze. Don't miss out on their services!
ReplyDeleteCrafting a compelling narrative begins with a great story board
ReplyDelete, and I've found a game-changer at story-board.ai. Their platform not only simplifies the process of creating engaging storyboards but also offers a wealth of resources to enhance storytelling skills.
This comment has been removed by the author.
ReplyDeletePlanning our wedding was a breeze with legal wedding officiant
ReplyDelete. Their legal wedding officiant services are top-notch, and they made sure our special day was truly special.
Airport Wifi Hire pocket wifi london
ReplyDeleteservice gave me peace of mind during my trip. I never had to worry about losing connection while exploring the city.
Navigate the world of remote work with ease, thanks to RocketBear's Remote work video solutions! Their expertly crafted videos offer valuable insights, tips, and best practices for maximizing productivity and success in a virtual environment. Whether you're a remote team member or managing remote teams, RocketBear's videos provide the guidance needed to thrive in today's digital workplace.
ReplyDeleteI've been burned by buying used devices in the past, but refurbished is a whole different ball game. With refurbished, you get the reliability of new with the savings of used. It's the best of both worlds. https://smartimobile.com
ReplyDeleteOne of the exciting trends in Folding Cartons In Miami boxes is the integration of smart packaging technologies. Imagine a box that not only protects your product but also provides interactive experiences for the consumer.
ReplyDeleteNeed reliable E Commerce Boxes in Miami? Boxes 4 Products ensures your products are delivered safely and securely.
ReplyDeleteConsidering effective retargeting services? Venzi Media excels in crafting personalized retargeting strategies that bring back lost leads and increase conversions. Their approach ensures that your ads are shown to users who have already shown interest in your products or services, maximizing the chances of conversion.
ReplyDelete요즘 스트레스로 몸이 무거웠는데, 중간에 오산출장마사지 받으면서 편안함을 느꼈습니다. 마사지사의 손길이 부드럽고 정확하여 근육이 풀리는 느낌이 좋았어요. 시설도 청결하고 직원들도 친절하여 마음 놓고 이용할 수 있었습니다. 다음에도 꼭 방문할 예정입니다.
ReplyDelete집에서 편안하게 받는 출장마사지 몸과 마음의 휴식에 큰 도움이 되었습니다. 마사지를 받고 나면 에너지가 충전되고 피로가 사라집니다.
ReplyDelete불필요한 상품권을 효율적으로 현금으로 바꿀 수 있는 문화상품권 자산을 효과적으로 활용할 수 있게 도와주며, 빠른 처리와 간단한 절차로 인해 사용이 편리하고 안정적인 서비스로 많은 이용자들에게 긍정적인 평가를 받고 있습니다. 실용성이 큽니다.
ReplyDelete소액결제현금화 빠른 자금 확보가 필요한 상황에서 효과적인 방법으로 보이며, 간단한 절차로 이용할 수 있어 편리함이 큽니다. 접근성이 좋아 많은 사람들이 선호하지만, 수수료와 조건을 충분히 확인하는 것이 중요합니다.
ReplyDelete소액현금화는 급하게 돈이 필요한 순간에 매우 유용한 문화상품권매입 수단이 될 수 있습니다. 특히 즉시 현금이 필요한 상황에서 빠르게 대응할 수 있다는 점이 큰 장점으로 느껴집니다.
ReplyDelete